
Damaged hair doesn't always need a salon rescue. Whether your strands are fried from heat styling, stripped by color treatments, or just parched from everyday wear, hair repair treatments at home can make a real difference, often with ingredients already sitting in your kitchen or products you can order today. I learned this firsthand after bleaching my thick, wavy dark brown hair blonde and watching it turn into a frizzy, brittle mess. Nothing felt like it worked until I started combining the right DIY remedies with products actually formulated for repair.
That trial-and-error process is exactly why we built Beautifully Within, to help you skip the guesswork and find what actually delivers results for your hair type. Our approach to beauty and wellness has always been about real solutions, not hype, and hair repair is no exception.
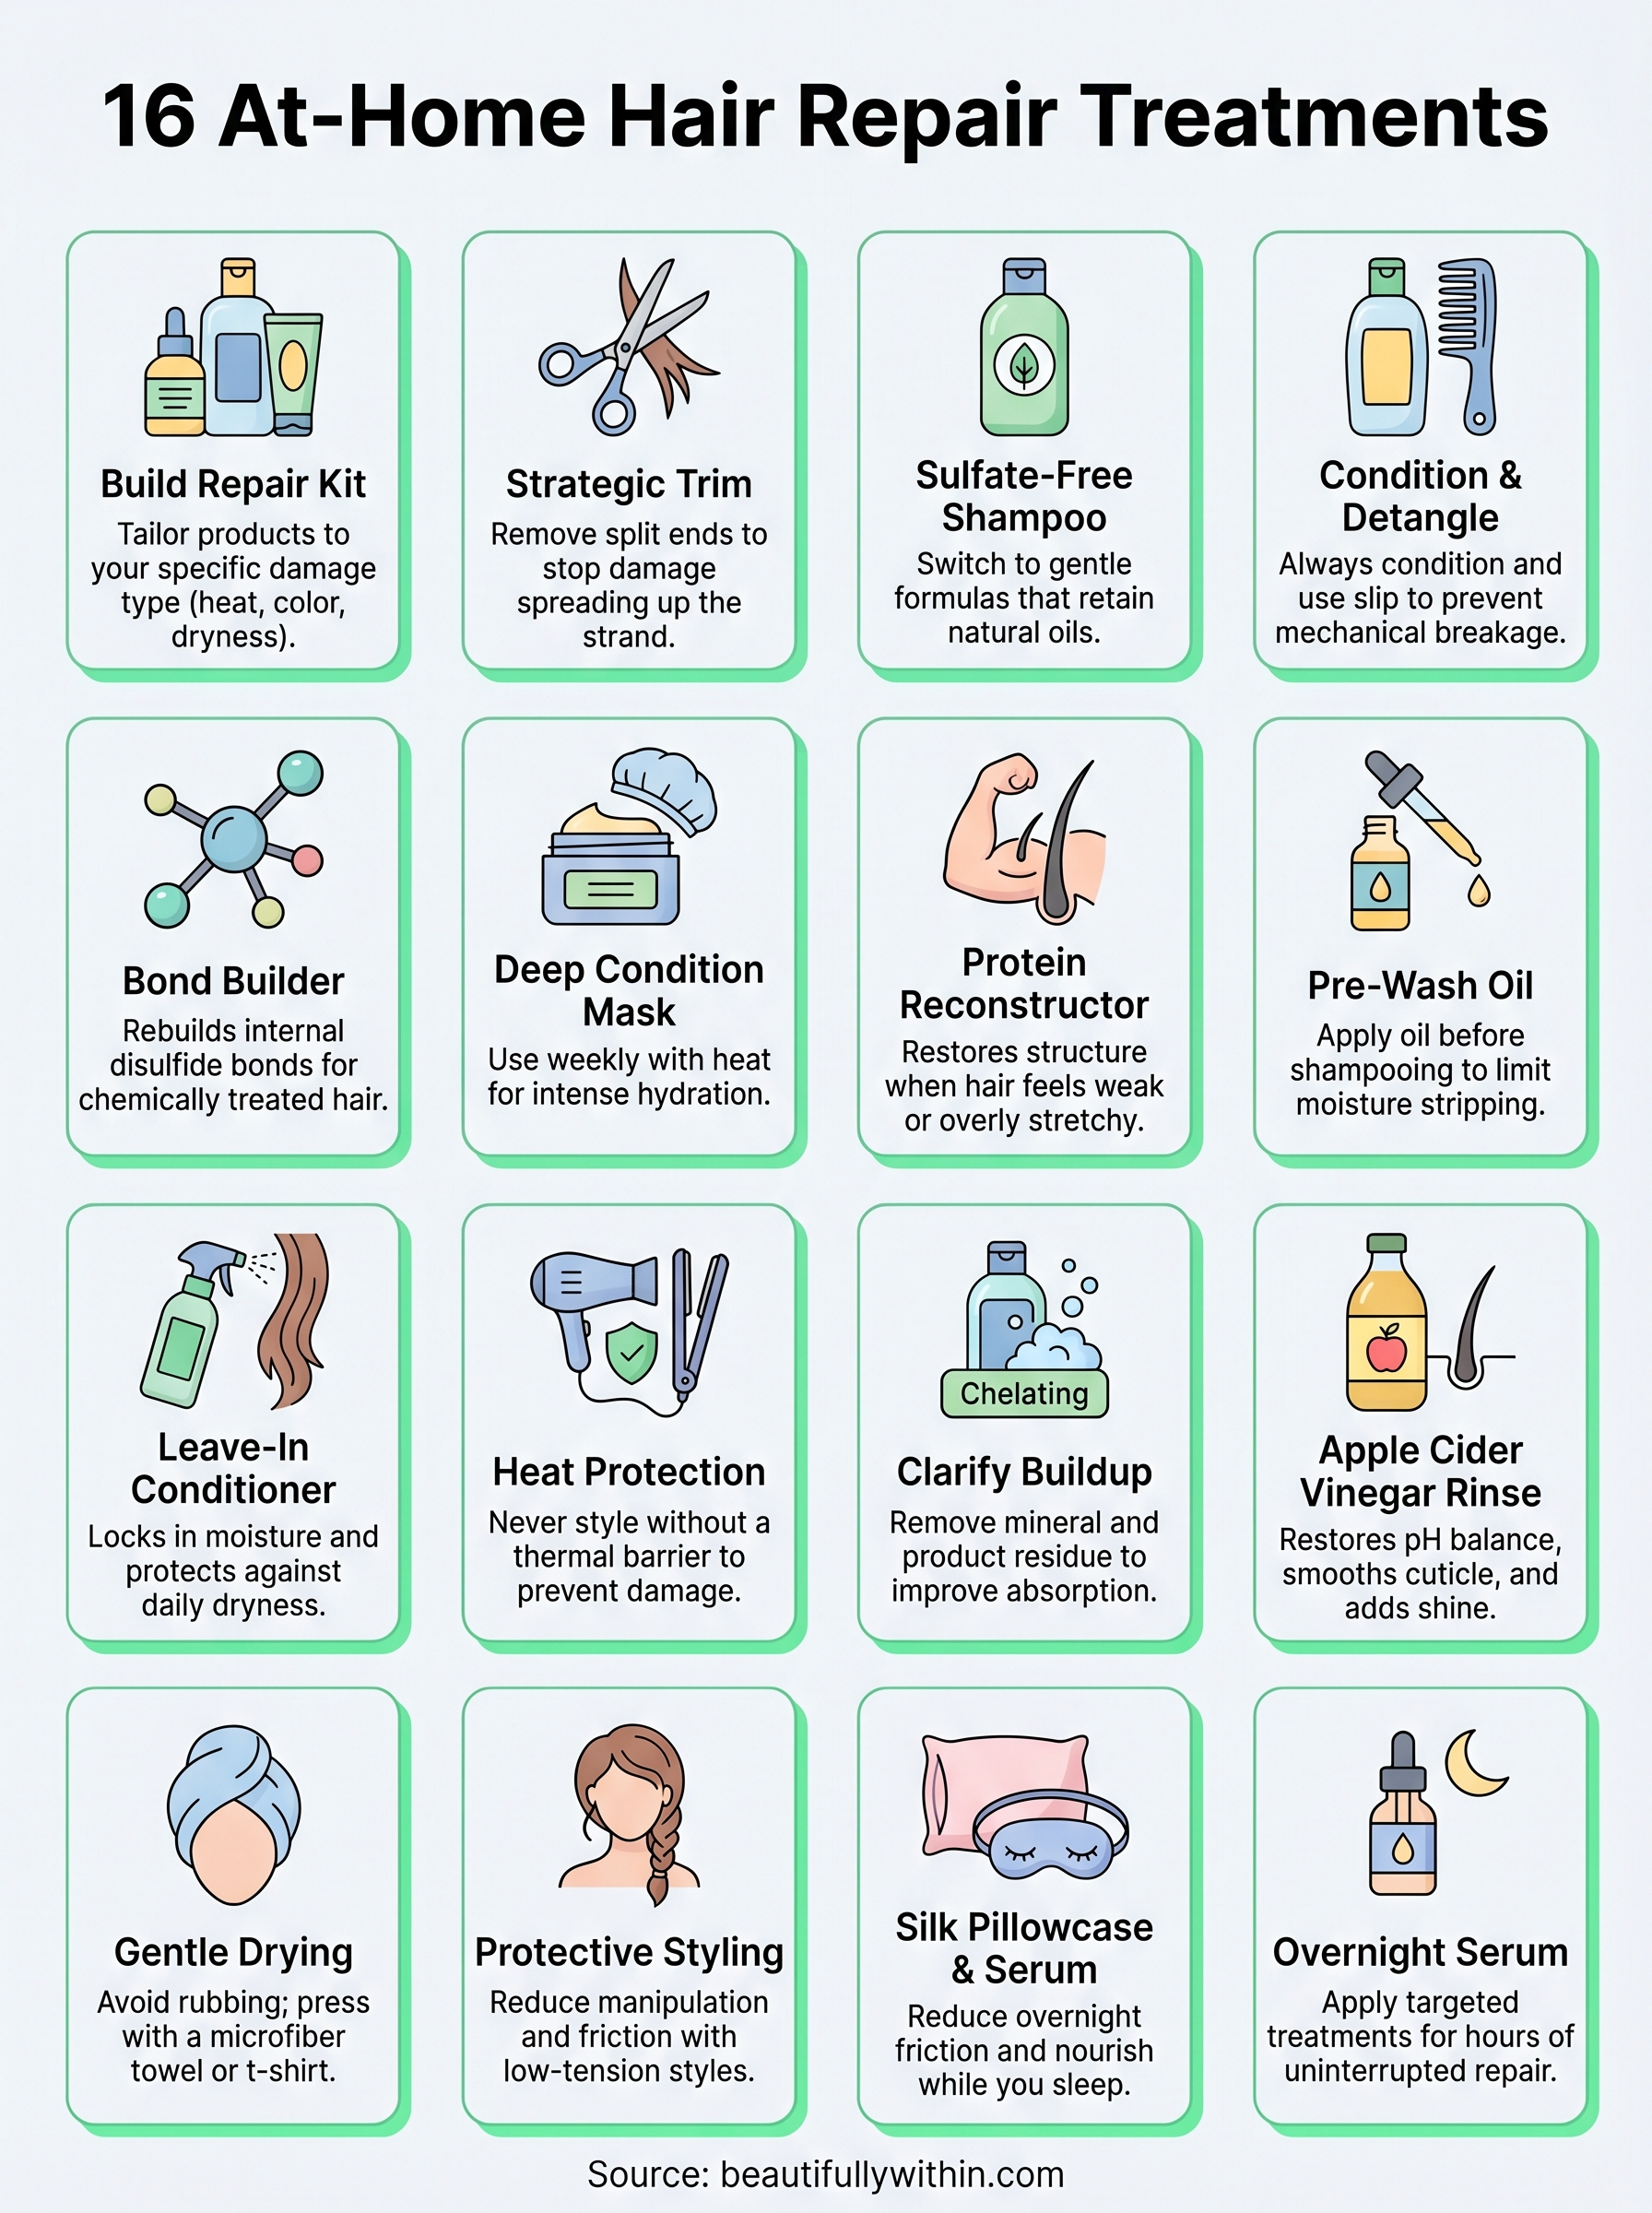
In this guide, you'll find 16 proven treatments you can do at home, from simple pantry masks to professional-grade products that target breakage, dryness, and split ends. Each one includes clear steps you can follow tonight, plus honest notes on what works best for different hair types. No salon appointment required.
1. Build your at-home repair kit from Beautifully Within
Before you try a single treatment, it helps to put together the right starting lineup. Effective hair repair treatments at home work best when you have products that match your specific damage type, not just whatever's sitting in your shower.
What this fixes and why it works
A well-stocked repair kit shortens the gap between "my hair is a mess" and "my hair actually feels healthy again." When you combine targeted treatments (bond builders, masks, and oils) with a consistent routine, your hair gets multiple repair signals working together instead of relying on one product to do everything.
The biggest reason home repair fails is using the wrong product for the wrong problem, not because home treatments don't work.
What to buy by damage type
Your damage type should drive your purchases. Buying based on general "repair" claims wastes money. Use this quick guide to match your hair's condition to the right product categories:
| Damage Type | Products to Prioritize |
|---|---|
| Heat damage | Moisturizing mask, heat protectant, leave-in conditioner |
| Color or bleach damage | Bond builder, protein reconstructor, deep conditioner |
| Chronic dryness | Pre-wash oil, hydrating shampoo, overnight serum |
| Breakage and thinning | Protein treatment, gentle shampoo, scalp serum |
Key ingredients to look for on labels
Reading labels takes two minutes and saves you from buying products that sound good but deliver nothing real. For moisture repair, look for hyaluronic acid, glycerin, shea butter, and aloe vera. For bond and protein repair, look for hydrolyzed keratin, amino acids, and bis-aminopropyl diglycol dimaleate.
Fragrance and sensitive scalp considerations
Many repair products are loaded with synthetic fragrance to mask chemical smells, but those compounds can irritate an already-compromised scalp. At Beautifully Within, we prioritize products with refined, gentle scents that perform without triggering sensitivity. If your scalp tends to react, filter your choices toward fragrance-free or naturally scented formulas first.
Budget ranges to expect
You don't need to spend a lot to build a useful kit. Start with what your hair needs most right now, then add from there:
- $10-$20: Sulfate-free shampoo, ACV rinse supplies, basic DIY mask ingredients
- $20-$40: Leave-in conditioner, heat protectant, pre-wash oil
- $40-$80: Bond builder, protein reconstructor, quality deep conditioning mask
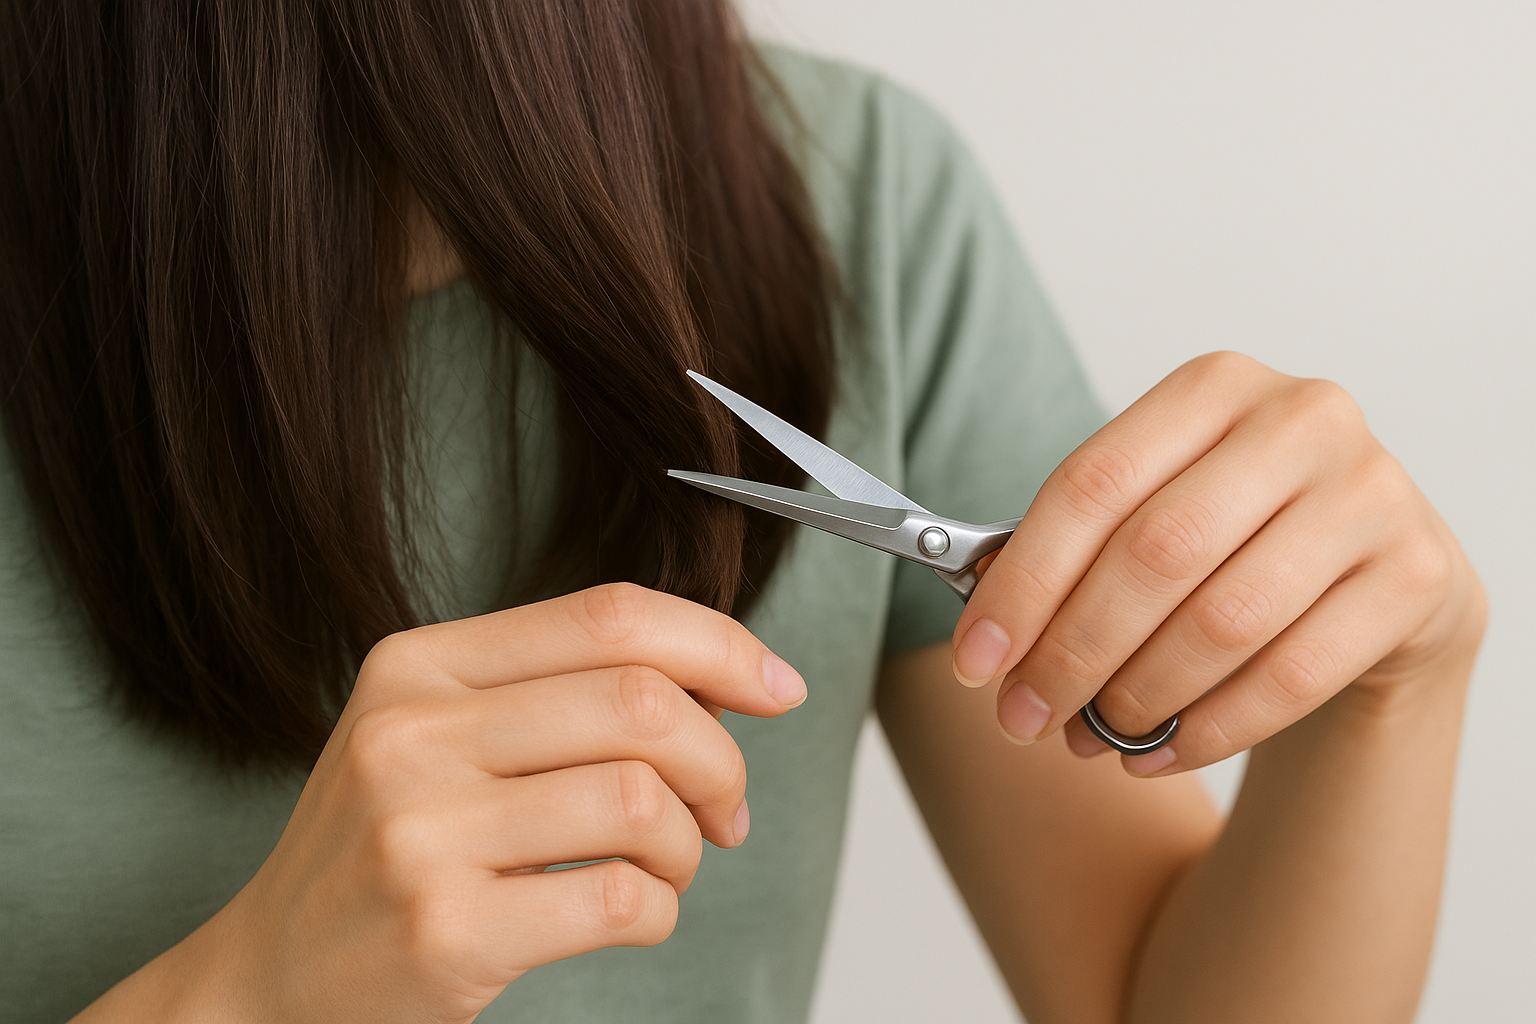
2. Get a strategic trim or dusting
Split ends don't heal. No product can fuse a split back together, so leaving damaged ends on just lets the fracture travel further up the shaft. A strategic trim removes the problem at the source and stops existing damage from spreading, making every other treatment you apply far more effective.
What this fixes and why it works
A trim targets split ends and single-strand knots, which cause tangling, breakage, and dullness at the ends. Removing even a quarter inch of damaged length gives the remaining hair a cleaner cuticle edge that reflects light and accepts moisture more readily. This is one of the most underrated hair repair treatments at home because people assume scissors belong only in a salon.
Cutting half an inch of split ends does more for your hair's health than a month of treatments applied to ends that are already splitting further up the strand.
How to do it at home without over-cutting
Use sharp hair-cutting scissors only and never substitute kitchen or craft scissors, which crush the hair shaft and create new splits. The dusting method means twisting each small section tightly and snipping only the frayed tips that stick out, so you lose minimal length while removing actual damage.
Best for
This works for all hair types dealing with split ends, breakage, or dullness. Fine hair that tangles easily benefits most from regular dusting between trims.
How often to do it
Plan a trim every 8 to 12 weeks for general maintenance, or more frequently if you heat style several times a week.
Common mistakes to avoid
Avoid cutting hair when it's soaking wet, since wet curly or wavy hair appears longer than it is and you risk cutting off more than intended. Dull scissors are equally problematic because they crush the cuticle instead of making a clean cut.
3. Switch to a gentle, sulfate-free shampoo
Your shampoo is the first product that touches your hair in every wash cycle, so starting with the wrong formula undoes every other treatment you apply. Sulfate-based shampoos strip the natural oils your hair needs to stay elastic and hydrated, which pushes already-damaged strands closer to breaking.
What this fixes and why it works
Sulfates are detergents strong enough to degrease engines, so using them on dry, chemically treated, or heat-damaged hair accelerates moisture loss and breakage. Switching to a sulfate-free formula keeps your scalp's natural oils intact between washes, giving each repair treatment a better chance to actually penetrate the shaft instead of washing straight out.
Your shampoo can either support your repair routine or cancel it out entirely.
How to choose the right cleanser for your hair type
Match your shampoo to your hair's current condition, not just your general hair type. Fine or oily hair does well with lightweight, volumizing sulfate-free formulas, while thick, coarse, or chemically processed hair needs creamy, hydrating options that contain aloe, glycerin, or panthenol to maintain softness throughout the week.
Best for
This is one of the most foundational hair repair treatments at home for anyone managing chronic dryness, color damage, frizz, or breakage, regardless of hair texture.
How often to wash when hair feels damaged
Wash two to three times per week at most while your hair recovers. Daily washing, even with a gentle formula, removes moisture faster than your hair can rebuild it.
Common mistakes to avoid
Avoid applying shampoo directly to your ends. Focus lather on your scalp only and let rinse water carry the product through the lengths, which prevents unnecessary stripping of already-fragile strands.
4. Condition every wash and detangle with slip
Skipping conditioner or rushing through it is one of the fastest ways to undo a repair routine. Conditioner seals the cuticle, restores moisture lost during cleansing, and gives your hair enough slip to detangle without snapping strands that are already weakened.
What this fixes and why it works
Conditioner directly addresses surface-level dryness, rough cuticles, and tangles that lead to breakage during brushing and styling. When your hair is damaged, the cuticle layer lifts and catches on itself, creating friction and knots. A good rinse-out conditioner smooths those lifted scales back down, which reduces mechanical breakage before it starts.
Detangling dry or rough hair without conditioner is one of the most avoidable causes of daily breakage.
How to apply conditioner for maximum slip
Apply conditioner mid-shaft to ends only, since roots rarely need extra moisture. Use a wide-tooth comb or your fingers to work the product through your hair while it's still coated. Let it sit for two to three minutes before rinsing with cool water, which helps lock the cuticle closed.
Best for
This is one of the most accessible hair repair treatments at home for anyone dealing with tangles, dryness, frizz, or breakage. It works across all hair textures, though thick or coily hair may need a heavier formula with more slip.
How often to do it
Condition every single time you shampoo, without exception. On non-wash days, a light leave-in handles any dryness between sessions.
Common mistakes to avoid
Avoid rinsing conditioner out with hot water, which reopens the cuticle you just smoothed down. Also avoid loading conditioner onto your scalp, which leads to buildup and weighs down new growth.
5. Use a bond builder for color or bleach damage
Bleach and color processes break the disulfide bonds inside your hair shaft, which are the structural links that give each strand its strength and elasticity. No amount of moisturizing fixes that kind of internal damage. Bond builders work at the molecular level to reconnect broken bonds and rebuild the actual structure of your hair, making them one of the most targeted hair repair treatments at home for chemically processed strands.
What this fixes and why it works
Bond builders address internal structural damage caused by bleach, permanent color, perms, and relaxers. Unlike surface conditioners, these treatments penetrate the cortex and re-form broken disulfide bonds, which restores tensile strength and reduces snapping during detangling and styling.
If your hair stretches and breaks instead of bouncing back when you pull a strand, that's a sign your bonds are compromised.
How to use bond builders at home
Apply your bond builder to clean, damp hair after shampooing, following the product's specific instructions since formulas vary. Some are added directly to your color mixture, while others are used as a standalone treatment before or after washing. Work the product through mid-shaft to ends and allow the full recommended processing time before rinsing.
Best for
This treatment is best for color-treated, bleached, permed, or relaxed hair showing signs of elasticity loss, extreme brittleness, or snapping.
How often to do it
Use a bond builder once or twice a week during active recovery, then drop to once a month for maintenance once strength improves.
Common mistakes to avoid
Avoid layering a bond builder with a heavy protein treatment in the same session, which can push hair toward stiffness and brittleness rather than flexibility.
6. Deep condition with a moisturizing mask
A regular conditioner rinses out in two minutes and handles daily maintenance, but it doesn't have the time or concentration to penetrate deeper layers of a damaged strand. A moisturizing mask stays on longer, uses higher concentrations of hydrating actives, and pushes real moisture into hair that has been depleted by heat, color, or environmental stress.
What this fixes and why it works
Deep conditioning directly targets cortex-level dehydration, which is what causes that straw-like texture you feel when your hair is truly damaged. A moisturizing mask floods the strand with humectants and emollients that restore flexibility and softness from the inside out, reducing the brittleness that leads to breakage during everyday handling.
Hair that snaps during gentle detangling almost always needs moisture before it needs anything else.
How to deep condition for real hydration
Apply your mask generously to damp, freshly shampooed hair, working from mid-shaft to ends. Cover your hair with a plastic processing cap and add gentle heat from a hooded dryer or a warm towel for 20 to 30 minutes. Heat opens the cuticle slightly and helps the product absorb deeper than it would at room temperature. Rinse with cool water to seal the cuticle closed.

Best for
This is one of the most effective hair repair treatments at home for dry, heat-damaged, or color-treated hair. Thick and coily textures benefit most, though any hair type struggling with dryness will notice a difference after the first session.
How often to do it
Deep condition once a week during active repair, then pull back to every two weeks once your hair's elasticity and softness improve.
Common mistakes to avoid
Avoid applying a mask to completely dry hair, which limits absorption. Also skip this step back-to-back with a protein treatment since layering both in the same week can push your hair toward protein overload, leaving it stiff and prone to snapping.
7. Add a protein reconstructor when hair feels weak
Moisture alone cannot fix hair that has lost its structural integrity. When your strands feel limp, stretchy, and unable to hold a style, a protein reconstructor fills in the gaps left by damage and rebuilds the internal scaffolding that keeps each strand strong.
What this fixes and why it works
Protein reconstructors target porosity damage and cortex degradation caused by repeated heat styling, chemical processing, and mechanical stress. They deposit hydrolyzed proteins into the hair shaft that temporarily patch weak spots, restore tensile strength, and reduce the snap-and-break cycle that keeps damaged hair from growing out.
If you stretch a wet strand and it just breaks without any give, your hair needs protein before it needs moisture.
How to tell if you need protein vs moisture
Run a simple strand test on a wet section of hair. Hair that stretches too far and doesn't spring back is protein-deficient. Hair that snaps immediately with no stretch at all is over-proteined and needs moisture instead. Knowing which problem you have before choosing a product is one of the smartest moves in any hair repair treatments at home routine.
Best for
This treatment works best for chemically processed, heat-damaged, or high-porosity hair that tangles easily, loses shape quickly, or breaks during light detangling.
How often to do it
Use a protein reconstructor once every two to four weeks depending on how your hair responds. More frequent use can tip the balance toward stiffness.
Common mistakes to avoid
Avoid skipping a moisturizing deep conditioner after a protein treatment. Protein firms up the strand, and moisture restores the flexibility your hair needs to stay elastic rather than brittle.
8. Try a pre-wash oil treatment
A pre-wash oil treatment is one of the simplest hair repair treatments at home that most people skip entirely. Applying oil before shampoo rather than after changes what your cleanser actually strips from your hair, and that shift makes a meaningful difference in how your hair feels after every wash.
What this fixes and why it works
Shampoo removes oils from your hair shaft during every wash, and damaged hair has very little protective oil to spare. Applying oil before you shampoo creates a barrier that limits how much moisture your strands lose during cleansing, which keeps the hair shaft from drying out as aggressively with each wash cycle.
A pre-wash oil step essentially acts as a buffer between your hair's internal moisture and your shampoo's cleansing action.
How to do a pre-shampoo oiling step
Apply a generous amount of coconut, argan, or olive oil to dry hair from mid-shaft to ends at least 30 minutes before washing. For deeper penetration, leave the oil on for one to two hours or overnight with your hair wrapped in a loose bun. Then shampoo as normal and follow with conditioner.

Best for
This step works best for dry, brittle, or high-porosity hair that feels stripped and rough immediately after every wash. Coily and thick textures respond especially well to overnight treatments.
How often to do it
Aim for once a week during active repair. If your hair starts to feel weighed down, scale back to every other week and adjust the amount of oil you apply.
Common mistakes to avoid
Avoid applying oil to soaking wet hair, since water blocks the oil from coating the shaft properly. Also skip heavy oils like castor oil on fine hair, as they tend to weigh strands down and are difficult to fully rinse out.
9. Use a leave-in conditioner to reduce breakage
A leave-in conditioner is the bridge between your wash day and your next shampoo session. It keeps moisture locked into your strands throughout the week and gives your hair a soft, pliable texture that resists snapping during everyday handling.
What this fixes and why it works
Leave-in conditioner tackles daily mechanical breakage caused by detangling, friction from clothing, and environmental dryness between wash days. Damaged hair loses moisture faster than healthy hair because the cuticle layer is compromised, and a leave-in continuously replenishes that hydration rather than waiting until your next wash to address it.
Think of a leave-in as daily maintenance for your repair routine, not an optional add-on.
How to apply leave-in without buildup
Apply your leave-in to clean, damp hair immediately after washing, focusing on mid-shaft to ends. Use a small amount and spread it evenly with your fingers or a wide-tooth comb before styling. Less product applied consistently beats a heavy application once in a while and prevents the buildup that clogs your scalp over time.
Best for
This is one of the most practical hair repair treatments at home for anyone managing dryness, frizz, or daily breakage. It works across all hair types, though thick, coily, or chemically treated hair benefits most from heavier cream-based formulas.
How often to do it
Apply leave-in every wash day, and refresh lightly on dry hair mid-week if your ends start to feel rough or brittle before your next wash.
Common mistakes to avoid
Avoid applying leave-in to completely dry hair, which limits absorption and leads to sticky buildup. Also skip applying it directly to your scalp and roots, which weighs down new growth and can clog follicles over time.
10. Protect from heat every time you style
Styling tools are one of the leading causes of ongoing hair damage, and the fix is simple: apply a heat protectant before every single session. Skipping this step even occasionally creates compounding damage that moisturizing treatments alone cannot undo. Your hair can only handle so much thermal stress before the structure starts breaking down faster than any repair routine can rebuild it.
What this fixes and why it works
Heat protectants create a thermal barrier between your styling tools and your hair shaft, which limits how much moisture escapes during styling and slows protein degradation. High heat cracks the cuticle and weakens the cortex, so protecting against it before each session is one of the most effective hair repair treatments at home for anyone who styles with tools regularly.
Skipping heat protectant twice a week adds up to cumulative damage that a monthly deep conditioning mask cannot fully reverse.
How to use heat protectant correctly
Apply your protectant to damp, towel-dried hair before blow drying, or to dry hair immediately before using a flat iron or curling tool. Spread it evenly from mid-shaft to ends and let it absorb for 30 seconds before applying any heat. Do not overload your roots, which only causes buildup without protecting the sections most vulnerable to breakage.
Best for
This step is non-negotiable for anyone who heat styles, but color-treated, bleached, and fine hair benefit most since those types lose structural integrity faster under direct heat. Thick or coily hair needs a heavier spray or cream formula to fully coat each strand before tool contact.
How often to do it
Apply heat protectant every time you use a styling tool, without skipping. There is no scenario where heat styling without protection helps your hair recover.
Common mistakes to avoid
Avoid applying protectant to soaking wet hair, since trapped water on the shaft actually amplifies heat damage as it turns to steam. Also avoid setting tools above 380 degrees on already-damaged or chemically processed strands, which pushes heat past the threshold the hair can safely handle.
11. Clarify buildup with a chelating wash when needed
Product buildup and hard-water mineral deposits coat your hair shaft over time, creating a layer that blocks moisture and repair ingredients from penetrating. When your go-to conditioners and masks suddenly feel less effective, buildup is usually the culprit. Addressing it with a chelating wash is one of the most overlooked hair repair treatments at home that resets your entire routine fast.
What this fixes and why it works
Chelating shampoos use specific binding agents that latch onto mineral deposits and synthetic residues left behind by conditioners and styling products that regular shampoos cannot remove. Once that coating is gone, your hair shaft becomes more receptive, and every repair product you apply afterward absorbs properly instead of sitting on a sealed surface.
A chelating wash resets your hair's ability to take in moisture, making every treatment you apply afterward work noticeably better.
How to tell if you have product or hard-water buildup
Your hair feels dull, heavy, or coated right after washing, not just in need of a wash. Common signs also include products stopping mid-routine performance and strands that feel waxy or strangely resistant to new moisture despite consistent conditioning.
Best for
This step works best for anyone using silicone-heavy products or dry shampoo regularly, or for anyone washing with hard tap water. It benefits all hair textures dealing with unexplained dullness or reduced product performance.
How often to do it
Use a chelating shampoo once every three to four weeks at most. Using it more frequently strips your hair aggressively and undoes the moisture balance you have worked to rebuild.
Common mistakes to avoid
Avoid chelating immediately after a fresh color service, since it can pull pigment from the shaft. Always follow with a moisturizing deep conditioner directly after to restore the hydration the cleanse removes.
12. Try an apple cider vinegar rinse for shine
An apple cider vinegar rinse costs almost nothing and takes under five minutes to do, yet it consistently delivers results that many expensive clarifying products cannot match. When your hair looks dull even after washing and conditioning, this rinse is often the fastest fix in any hair repair treatments at home routine.
What this fixes and why it works
Your hair's cuticle functions best at a slightly acidic pH, roughly between 4.5 and 5.5. Most shampoos and tap water are more alkaline, which lifts the cuticle and creates a rough, light-scattering surface that looks dull and feels coarse. Apple cider vinegar lowers the pH of your hair after washing, which flattens the cuticle back down, reflects light evenly, and reduces the friction that causes tangles.
A sealed cuticle is the difference between hair that looks glassy and hair that looks flat no matter what products you apply.
How to do it safely at home
Mix one to two tablespoons of raw apple cider vinegar with one cup of water in a spray bottle or small container. After shampooing and rinsing out your conditioner, pour or spray the diluted mixture over your hair and work it through from roots to ends. Leave it on for two minutes, then rinse thoroughly with cool water. The vinegar smell disappears once your hair dries completely.
Best for
This rinse works well for dull, lackluster, or buildup-prone hair across all textures. Fine hair that goes flat quickly responds particularly well since the pH correction adds noticeable body and shine without weighing strands down.
How often to do it
Use this rinse once every one to two weeks as a reset. More frequent use can dry out your scalp if your skin is already sensitive.
Common mistakes to avoid
Avoid using undiluted apple cider vinegar directly on your scalp, which can cause irritation or dryness. Also skip this step on the same day you use a chelating shampoo, since combining two pH-disrupting steps back to back strips more moisture than your hair can quickly recover.
13. Upgrade your drying routine to prevent friction
Most hair damage from drying happens before a single styling tool ever touches your strands. Rubbing a terry cloth towel over wet hair creates intense friction along the cuticle, lifting and snagging the outer layer at the exact moment your hair is most fragile and vulnerable to breaking.
What this fixes and why it works
Wet hair swells and softens, which makes the cuticle temporarily more susceptible to mechanical damage than it is when dry. Switching to a gentler drying method reduces the breakage and frizz that accumulate silently every wash day. This upgrade is one of the most underrated hair repair treatments at home because it stops damage from entering your routine before any product even gets a chance to work.
How you dry your hair matters as much as what you put in it.
How to towel-dry without roughing up the cuticle
Swap your regular towel for a microfiber towel or a clean cotton t-shirt, which absorb water without the rough looped fibers that cause friction. Instead of rubbing, scrunch and press your hair gently in sections to squeeze out excess water, then loosely wrap your hair and let it sit for five to ten minutes before applying any leave-in or styling product.

Best for
This technique benefits all hair types, but wavy, curly, and color-treated hair see the most dramatic improvement in frizz reduction and breakage prevention with the switch.
How often to do it
Apply this approach every single wash day as a permanent replacement for your old towel-drying habit.
Common mistakes to avoid
Avoid wrapping your hair too tightly in a microfiber towel for extended periods, which can crease fragile strands and cause breakage at the fold points.
14. Use protective styling to stop daily damage
Every time you manipulate your hair, whether brushing, restyling, or tucking, you create mechanical stress that compounds over time. Protective styles limit how often your strands are handled directly, which gives damaged hair a real window to recover between treatments.
What this fixes and why it works
Protective styling reduces daily friction and tension at the ends of your hair, which are the oldest, most vulnerable sections on your strand. Keeping them tucked away from clothing, rough surfaces, and repeated styling is one of the most practical hair repair treatments at home you can apply without buying a single product.
Breakage at the ends is often caused not by what you put on your hair, but by how much you handle it each day.
Easy protective styles that reduce breakage
Simple options that actually work include loose braids, low buns, and two-strand twists secured with a satin scrunchie rather than rubber elastics, which cut into the shaft and snap fragile strands. These styles keep your ends coiled away from friction surfaces like jacket collars and rough fabrics throughout the day.
Best for
This step works especially well for fine, color-treated, or high-porosity hair that breaks easily during daily handling, and for anyone in an active repair phase where minimizing manipulation matters most.
How often to do it
Aim for protective styles three to five days per week during your repair period. The more consistently you limit manipulation, the less cumulative breakage builds up between wash days.
Common mistakes to avoid
Avoid securing styles too tightly at the root, which strains your follicles and causes traction breakage. Also skip any style that pulls your hairline back sharply, since repeated tension there leads to edge damage that products alone cannot reverse.
15. Overnight repair with a silk pillowcase and serum
Sleep gives you six to eight uninterrupted hours to let repair products work without any manipulation. Making the most of that window with the right surface and a targeted serum turns a passive activity into one of the most consistent hair repair treatments at home you can add to your routine.
What this fixes and why it works
Cotton pillowcases create surface friction that snags your hair throughout the night, roughing up the cuticle and causing breakage at your most fragile sections. Switching to silk or satin reduces that friction significantly, while an overnight serum works uninterrupted for hours to restore moisture and smooth the cuticle while you sleep.
Eight hours of low-friction contact and active serum absorption adds up to more cumulative repair time than most weekly treatments combined.
How to set hair up for sleep to reduce breakage
Apply a small amount of overnight serum or lightweight hair oil to your ends before bed, focusing on the driest sections. Loosely twist your hair into a single low bun secured with a satin scrunchie, then lie on your silk pillowcase to limit friction from every direction throughout the night.
Best for
This step works best for dry, brittle, or color-treated hair that needs consistent moisture replenishment between wash days without committing to a full treatment session. Fine hair benefits from a lightweight serum formula rather than a heavy oil to avoid limpness by morning.
How often to do it
Apply the serum two to three nights per week to avoid root buildup, and use the silk pillowcase every night as a permanent replacement for cotton.
Common mistakes to avoid
Avoid applying too much serum, which transfers to your pillowcase and leaves your hair feeling coated rather than nourished. Also skip putting wet hair into a tight bun for sleep, since prolonged tension on damp strands increases the risk of breakage at the fold.
A simple plan to start today
You don't need to tackle all 16 steps at once. Start with the three treatments that match your biggest damage type right now: swap your shampoo, deep condition this week, and protect your hair from heat before your next styling session. Those three moves alone will shift your hair's trajectory noticeably within two to three wash cycles. From there, add one new step every week until your routine covers moisture, protein, and protection consistently.
The most effective hair repair treatments at home aren't complicated. They work because you do them consistently, with the right products for your specific hair. Every treatment in this guide compounds on the last, so the sooner you start, the faster your hair responds. If you're ready to put the right products in your routine from day one, explore the hair care collection at Beautifully Within and find exactly what your strands need next.