
How to Repair Damaged Hair Fast at Home: Step-by-Step Guide
You look in the mirror and see dry brittle strands staring back. Split ends everywhere. Frizz that refuses to cooperate. Your hair breaks when you brush it and feels like straw to the touch. You know something went wrong but you need answers on how to fix it fast.
Here's the truth. Once hair is damaged the structure is permanently altered. You cannot truly repair what's already broken. But you can dramatically improve how your hair looks and feels while preventing more damage. The right treatments can seal the cuticle smooth moisture back into the shaft and restore shine and softness in days.
This guide walks you through exactly what to do. You'll learn how to diagnose your specific damage type and stop making it worse today. Then you'll discover which treatments work fastest for your hair and how to build a simple routine that keeps results lasting. You can see real improvement in your hair within a week when you follow these steps in order.
What damaged hair really is
Your hair is not alive. Each strand is made of dead protein cells called keratin that your body pushes out from follicles in your scalp. This matters because dead cells cannot heal themselves the way your skin does when it gets a cut. When you learn how to repair damaged hair, you're really learning how to improve its appearance and prevent further breakdown.
The structure you need to understand
Hair has three layers. The innermost layer (medulla) provides structural support. The middle layer (cortex) contains the pigment that gives your hair color and determines strength. The outer layer (cuticle) consists of overlapping scales that protect everything inside like shingles on a roof. When your cuticle lies flat and intact, your hair looks shiny and feels smooth. Light reflects evenly off the surface.
Damage happens when heat, chemicals, friction, or environmental stress break down this protective cuticle layer. The scales lift up or chip away entirely. Once exposed, the cortex loses moisture and protein. Your hair becomes porous, weak, and prone to breakage. The lifted cuticles catch on each other, creating tangles and frizz. Split ends form when the cortex splits into two or more pieces after losing its protective covering.
Why "repair" is misleading
You cannot glue the cuticle scales back into their original position. You cannot regenerate lost protein inside the cortex. The damage that exists in your hair shaft right now is permanent and irreversible. This is why many hair experts say the only real fix is cutting off the damaged portions and starting fresh.
True repair would require your hair to be alive and capable of regeneration, which it is not.
However, you can make dramatic cosmetic improvements that transform how your hair looks and behaves. The right products temporarily seal down lifted cuticles, fill in gaps with conditioning agents, and coat the strand with protective ingredients. Your hair appears shinier and feels softer because you've smoothed the surface and added back moisture. Deep treatments deposit proteins that strengthen the cortex from inside. These improvements last until you wash them out, which is why consistency matters. When you understand what's actually happening, you make smarter choices about which treatments to use and what results to expect realistically.
Step 1. Diagnose your hair damage
You need to identify your specific damage type before choosing treatments. Different problems require different solutions. Chemical damage from bleach needs more protein while heat damage needs intense moisture. Using the wrong treatment wastes time and can make things worse. Spend five minutes examining your hair right now to understand exactly what you're dealing with.
The touch and sight test
Start by running your fingers through dry, unwashed hair from roots to ends. Notice where it feels rough or catches on your fingers. Damaged hair feels coarse, brittle, or gummy depending on the type of damage. Healthy hair slides smoothly through your fingers with minimal resistance.
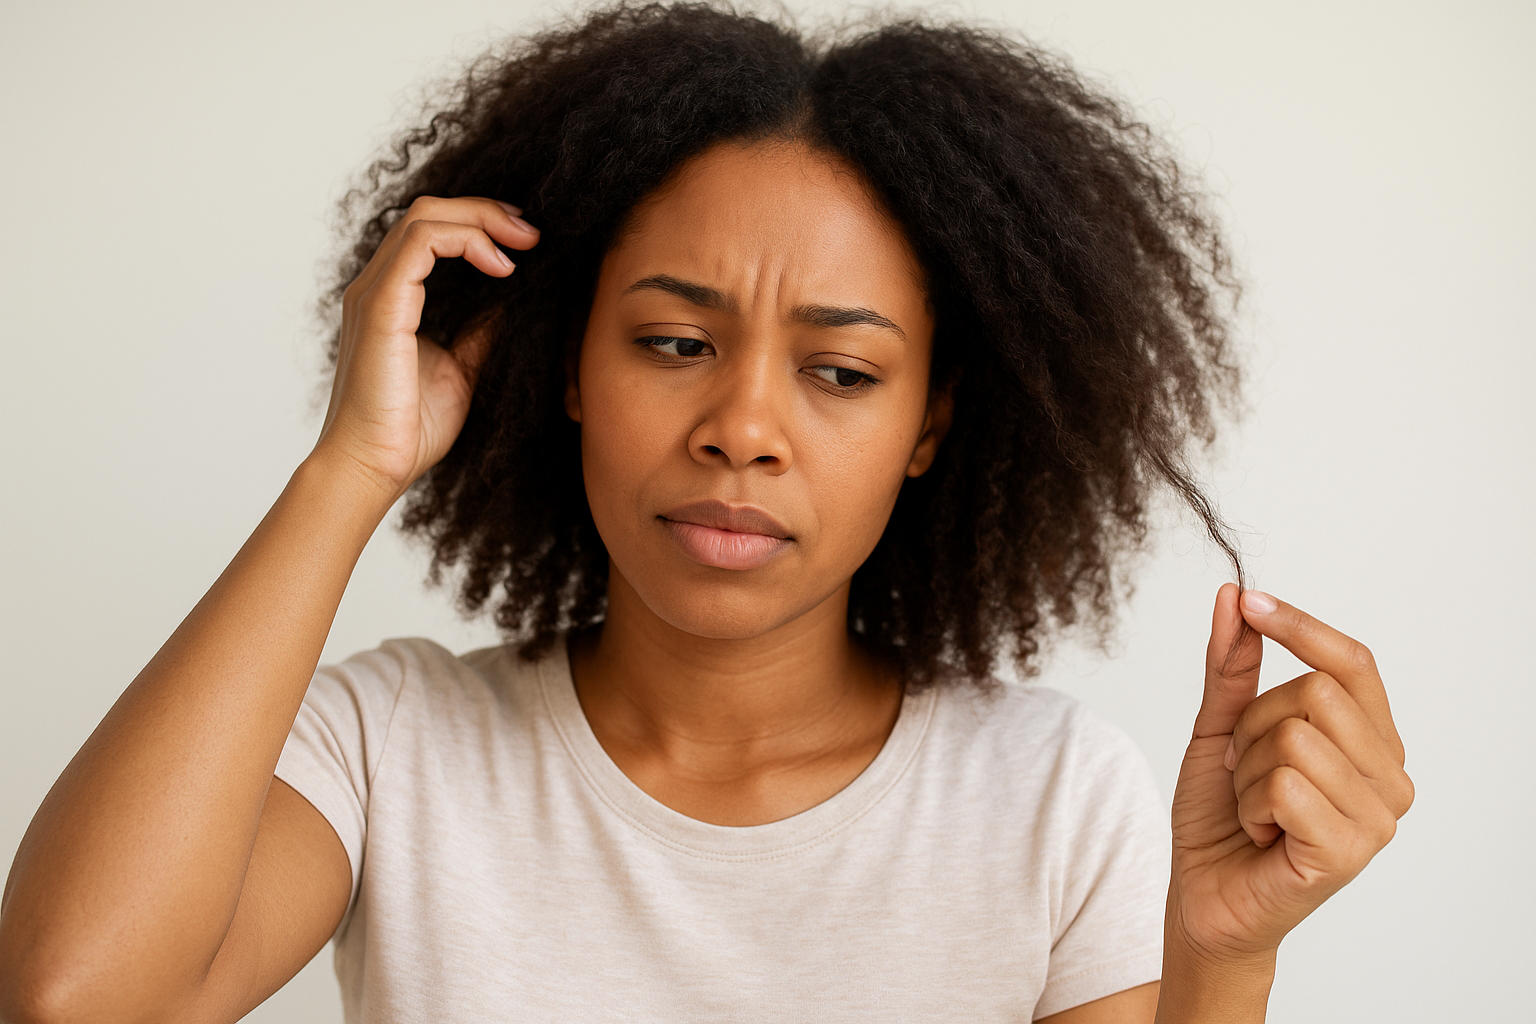
Pull a single strand and hold it up to natural light. Look for these specific signs:
- White dots along the shaft: These indicate breakage points where the hair snapped under stress
- Split ends: The strand divides into two or more pieces at the tip or along the length
- Uneven thickness: The hair looks thinner in some spots where the cortex has worn away
- Dull surface: Light doesn't reflect evenly because the cuticle is lifted and damaged
- Tangles that won't budge: Raised cuticles catch on each other creating knots
Try the elasticity test by gently stretching a wet strand. Healthy hair stretches about 30% of its length then bounces back. Damaged hair either snaps immediately or stretches too far without returning to normal shape.
Hair that breaks easily when wet has lost critical protein structure and needs strengthening treatments first.
Match your symptoms to damage types
Heat damage from flat irons, curling wands, or blow dryers creates stiff, straw-like texture. The ends look fried and feel crispy. You'll see uneven color where the heat scorched the hair. This damage concentrates on the areas you style most often.
Chemical damage from bleach, dye, or relaxers makes hair feel gummy when wet and rough when dry. The entire length suffers, not just the ends. Your hair tangles constantly and loses curl pattern if you have naturally textured hair. Color-treated damage often shows as excessive porosity where your hair soaks up water instantly then dries out fast.
Mechanical damage from tight hairstyles, aggressive brushing, or rough towel drying creates breakage around the hairline and crown. You'll notice shorter broken pieces sticking up in these areas. The damage pattern follows where you put the most physical stress. Environmental damage from sun exposure or chlorine makes hair feel dry all over with a faded, brassy color tone. Once you identify which pattern matches your hair, you can learn how to repair damaged hair with targeted treatments in the next steps.
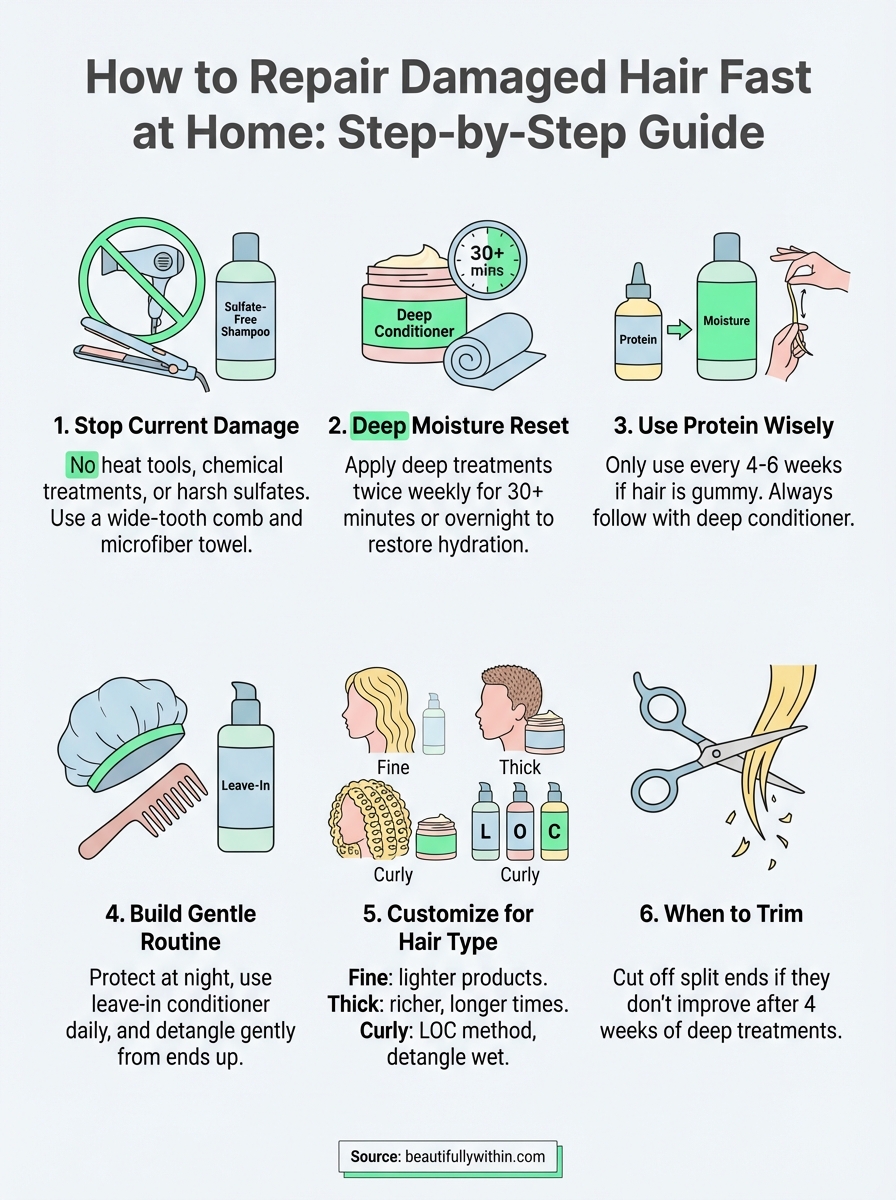
Step 2. Stop the current damage now
The most critical step in learning how to repair damaged hair is stopping additional damage before you start any treatment. You cannot fill a leaking bucket until you plug the hole. Your hair faces constant stress from heat, chemicals, friction, and styling habits that break down the structure faster than any treatment can rebuild it. Make these immediate changes today to prevent your situation from getting worse while you work on improvement.
What to eliminate immediately
You must put away all heat styling tools for at least two weeks. This means no flat irons, curling wands, hot rollers, or blow dryers on high heat. Each time you expose your hair to temperatures above 300°F, you boil the water inside the hair shaft and weaken the protein structure. The damage accumulates with every use. If you absolutely must blow dry, use the cool setting only and keep the dryer moving constantly at least six inches from your head.
Chemical treatments need to stop completely. Cancel any upcoming color appointments, relaxer sessions, or perms for the next month minimum. Your hair cannot handle additional chemical stress while you're trying to recover from existing damage. This includes at-home box dyes and purple toning shampoos that deposit pigment. These products contain harsh ingredients that strip moisture and lift the cuticle even when marketed as gentle or natural.
Switch your shampoo today if it contains sulfates, alcohol, or harsh detergents. Check the ingredient list for sodium lauryl sulfate or sodium laureth sulfate in the first five ingredients. These cleaners remove too much natural oil and leave your cuticle rough and exposed. Replace them with sulfate-free formulas that clean without stripping. You also need to stop washing your hair daily. Reduce washing to two or three times per week maximum to allow your scalp's natural oils to coat and protect each strand.
Damaged hair cannot recover while you continue the exact behaviors that caused the damage in the first place.
How to handle your hair gently
The way you physically manipulate your hair creates significant damage that most people overlook. Start by replacing your regular towel with a microfiber wrap or old cotton t-shirt. Regular towels have rough fibers that catch on lifted cuticles and cause breakage. Instead of rubbing your hair dry, gently squeeze out excess water and let the fabric absorb moisture while your hair sits wrapped for 10-15 minutes.
Change how you brush by using only wide-tooth combs or detangling brushes with flexible bristles. Never brush wet hair unless you have tightly coiled or textured hair that requires wet detangling. Work from the ends upward in small sections rather than raking through from roots to tips. This prevents you from dragging tangles down the length and snapping weak strands. Brush only when necessary, not the old advice of 100 strokes per day.
Loose hairstyles protect your hair better than tight styles during recovery. Avoid elastic bands, tight ponytails, or buns that pull on your roots and create tension breakage. Use soft scrunchies or cloth hair ties instead. Sleep with your hair in a loose braid or wrapped in a silk scarf to minimize friction against your pillow while you move during the night. These small adjustments prevent hundreds of new breakage points from forming while your treatments work to improve existing damage.
Step 3. Do a deep moisture reset
Your damaged hair desperately needs intense hydration to restore softness and manageability. Regular conditioner sits on your hair for seconds and barely penetrates the cuticle. A proper moisture reset requires deep conditioning treatments that stay on your hair for at least 20 minutes, allowing ingredients to absorb into the cortex. This step makes the biggest visible difference when you learn how to repair damaged hair at home because moisture transforms texture immediately.
What a moisture reset actually does
Deep moisture treatments work by forcing humectants and emollients into the hair shaft under the cuticle layer. Humectants like glycerin and honey attract water molecules from the air and bind them to your hair. Emollients like shea butter and oils coat the strand to seal in that moisture and smooth down the cuticle. Your hair can hold up to 30% of its weight in water when properly conditioned. Damaged hair loses this water retention ability because the lifted cuticles let moisture escape.
Moisture-focused treatments contain larger molecular ingredients than protein treatments. These bigger molecules fill the gaps in your damaged cuticle like spackling compound fills holes in a wall. They cannot permanently repair the structure, but they make your hair feel dramatically softer within one treatment. The effects last through 2-3 wash cycles depending on your hair's porosity level.
Severely damaged hair needs moisture first before it can benefit from protein, or you risk making it feel even more brittle.
The overnight treatment method
Start with freshly washed, damp hair that's been gently squeezed dry with a microfiber towel. Apply a thick layer of deep conditioner or hair mask from mid-shaft to ends, avoiding your roots unless your scalp is also dry. Use enough product that your hair feels completely saturated and slippery to the touch. Most people use too little and wonder why treatments don't work.
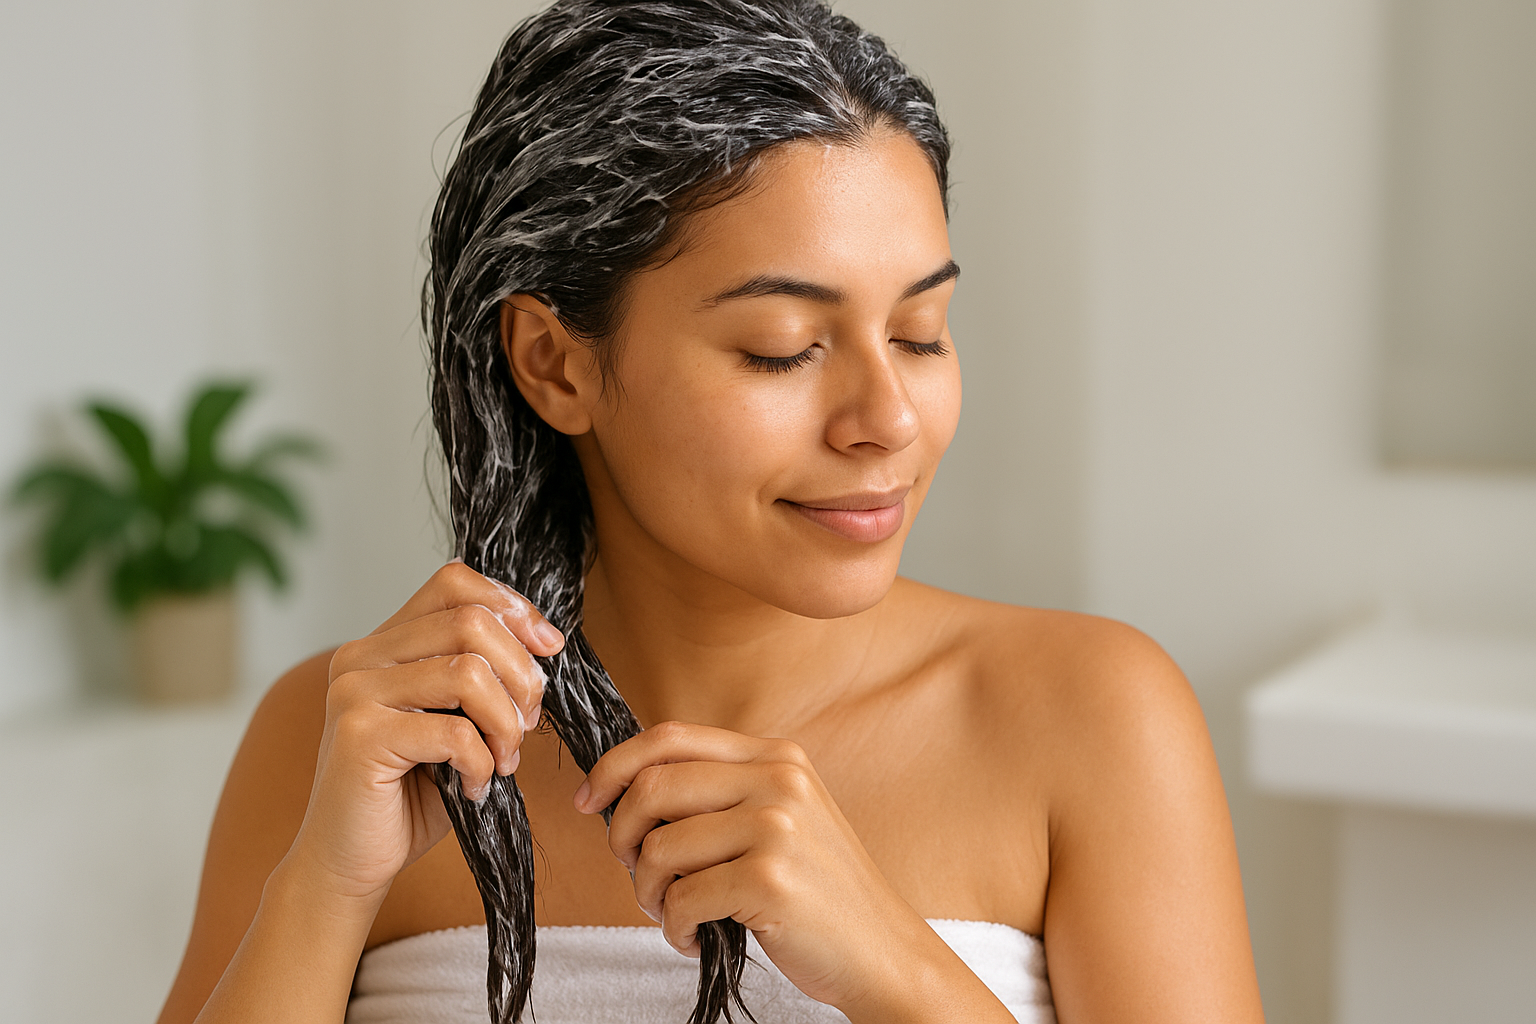
Divide your hair into four sections and twist each section loosely. Clip the twisted sections on top of your head. Cover everything with a plastic shower cap or wrap your hair in plastic wrap. The plastic traps your body heat and opens the cuticle wider to accept more conditioning ingredients. Leave this on for a minimum of 30 minutes or overnight for severely damaged hair.
Here's the exact timing guide:
- Mild damage: 30 minutes with heat
- Moderate damage: 2 hours without heat or 45 minutes with heat
- Severe damage: Overnight (6-8 hours) without heat
Rinse with cool water in the morning. The temperature change seals the cuticle back down with all the moisture locked inside. Your hair should feel noticeably smoother and easier to detangle immediately. Skip shampoo during this rinse to preserve the treatment benefits.
How often to repeat
Do this deep moisture reset twice per week for the first two weeks of your repair routine. You cannot over-moisturize damaged hair during the initial recovery phase. After two weeks, reduce to once per week for maintenance. Your hair will tell you when it needs moisture by feeling rough or tangling easily. Continue weekly treatments until your hair consistently feels soft between washes.
Step 4. Use protein treatments wisely
Protein treatments rebuild the internal structure of your hair by depositing amino acids and keratin into damaged areas of the cortex. Too much protein makes your hair stiff and brittle. Too little leaves it weak and limp. Understanding when and how to use protein is crucial when you learn how to repair damaged hair because the wrong timing can reverse your progress. Most people need protein far less often than they think, especially if moisture treatments already improved their texture.
When your hair needs protein
Your hair signals protein deficiency through specific symptoms that differ from moisture problems. Pull a strand and stretch it gently when wet. Hair that needs protein stretches too far without snapping back or feels gummy and limp. It lacks normal elasticity and structure. You might also notice your hair refuses to hold a curl, feels mushy when wet, or looks stringy no matter how much you condition it.
Chemical damage from bleach or relaxers depletes protein faster than other damage types. Heat damage also breaks down keratin bonds over time. However, if your hair feels straw-like, snaps easily, or tangles constantly, you probably need moisture first, not protein. Adding protein to already dry hair creates a brittle, stiff texture that breaks even more easily.
Only add protein treatments after you've restored basic moisture levels, or you risk making your hair feel worse.
How to apply protein correctly
Use protein treatments once every 4-6 weeks maximum for damaged hair. Start with a lighter protein formula rather than heavy reconstructor treatments. Look for products containing hydrolyzed wheat protein, silk amino acids, or keratin in the ingredient list. Apply the treatment to clean, damp hair for 15-20 minutes, then rinse thoroughly with cool water.
Follow this exact sequence for best results:
- Clarify your hair with a deep-cleansing shampoo to remove all product buildup
- Apply protein treatment from mid-shaft to ends, avoiding your roots
- Leave on for the time specified on the product (usually 10-20 minutes)
- Rinse completely until water runs clear
- Follow immediately with a moisturizing deep conditioner for 10 minutes
- Rinse again with cool water to seal everything in
The moisture step after protein is critical. Protein treatments alone leave hair feeling hard because they strengthen without softening. The deep conditioner balances the protein by adding flexibility and smoothness back. Skip this step and your hair feels worse than before you started. Watch how your hair responds over the next few days. Increase moisture treatments if it feels rough or decrease protein frequency if it feels coated or stiff.
Step 5. Build a gentle daily routine
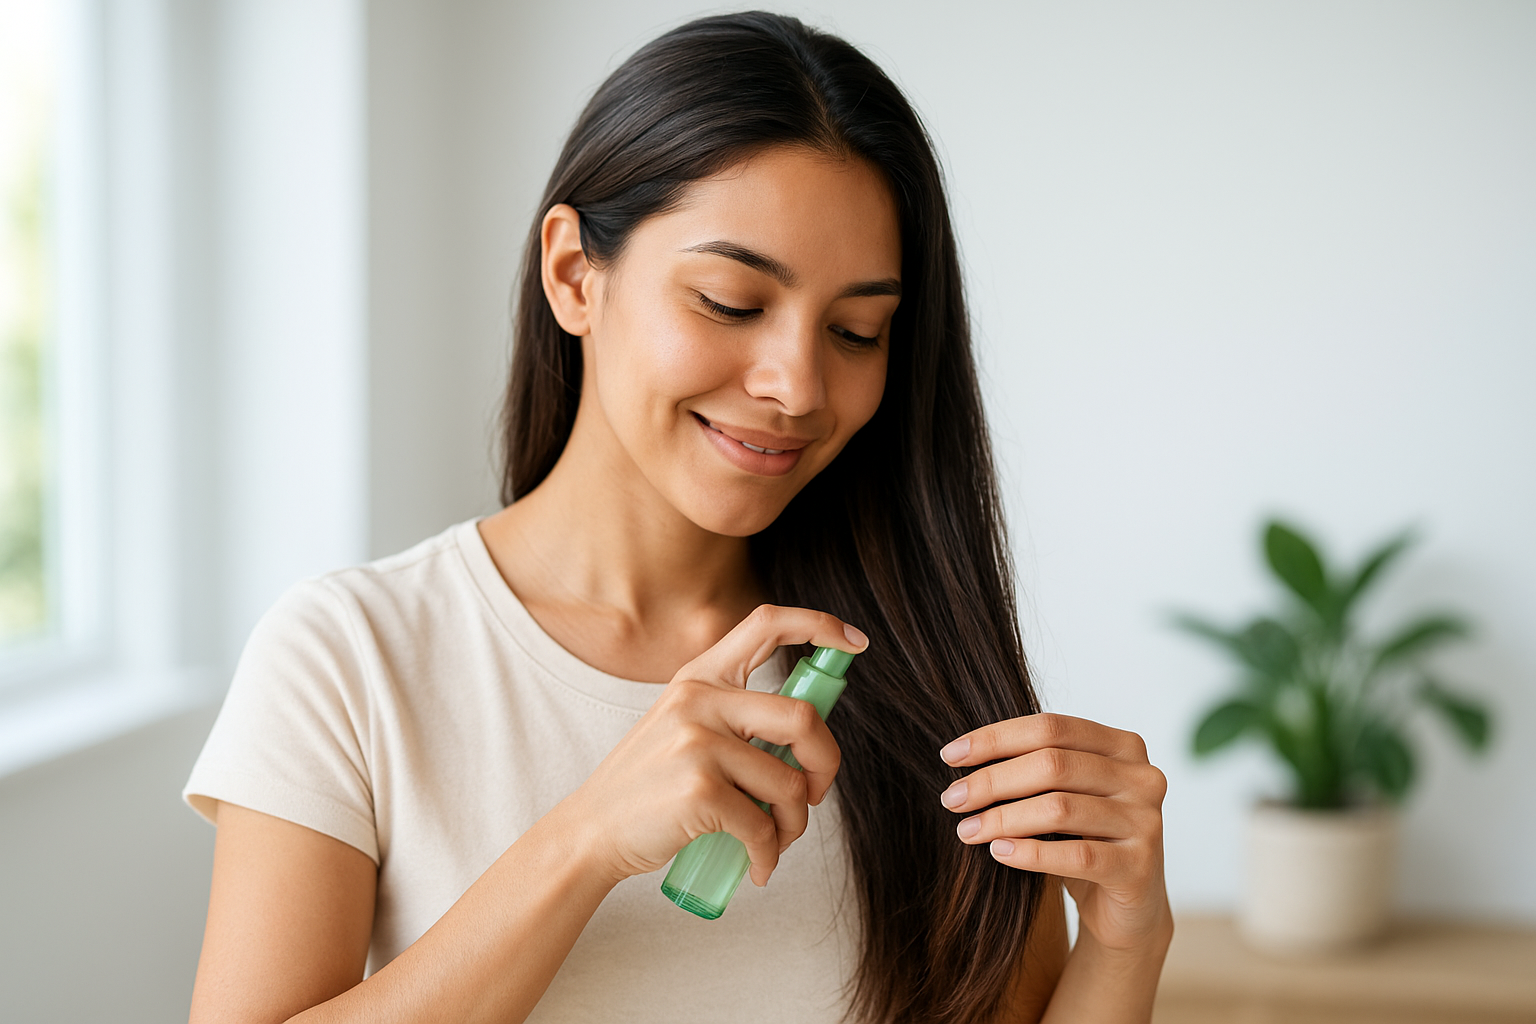
Your hair needs consistent care every single day to maintain the improvements you've made with deep treatments. A gentle daily routine prevents new damage while preserving moisture and smoothness between wash days. Most damaged hair gets worse because people use harsh techniques in their everyday habits without realizing the cumulative impact. When you master how to repair damaged hair, you must also master how to keep it healthy through simple daily actions that take less than five minutes.
Morning routine essentials
Start each morning by refreshing your hair without water. Spray a leave-in conditioner or light hair oil onto your palms and run your hands over your hair to smooth down any frizz from sleeping. Focus on the mid-lengths and ends where damage shows most. This seals your cuticle and adds a protective layer before you face environmental stressors like wind, sun, or indoor heating throughout your day.
Follow this exact morning sequence:
- Gently detangle with a wide-tooth comb or your fingers, starting from the ends
- Apply leave-in conditioner or lightweight oil to damp or dry hair
- Style without heat using braids, buns, or natural air-drying methods
- Protect from UV with a hat or UV-protective hair spray if spending time outdoors
- Secure loosely with soft scrunchies or silk hair ties if pulling hair back
Never brush your hair aggressively when you first wake up. The mechanical stress on fragile damaged strands causes hundreds of breakage points you cannot see. Take 30 seconds to work through tangles carefully instead of rushing through with force.
Evening protection habits
Your nighttime routine matters just as much as your morning prep. Friction against your pillowcase creates tangles and breakage while you sleep, undoing the progress you made during the day. Apply a small amount of hair oil to your ends before bed to keep them moisturized overnight and reduce friction.
Protect your hair using one of these methods every night:
- Loose braid: Divide hair into one or two braids, securing with soft fabric ties
- Silk or satin bonnet: Covers all your hair and eliminates pillow friction completely
- Silk pillowcase: Less effective than a bonnet but better than cotton fabric
- Loose twisted bun: Pin hair on top of your head with a soft scrunchie
Sleeping with your hair loose and unprotected on a cotton pillowcase can create as much damage as using a flat iron without heat protectant.
What to avoid daily
You must eliminate certain habits that seem harmless but accumulate damage over weeks. Stop touching your hair constantly throughout the day. Each time you run your fingers through your strands, you create friction and disturb the cuticle. Your hands also transfer oils and dirt that weigh down your hair and require more frequent washing.
Resist the urge to rewash your hair when it feels slightly oily or looks less than perfect. Overwashing strips the natural sebum your scalp produces to protect and condition each strand. Most damaged hair improves dramatically when you reduce washing frequency to every 3-4 days. Use dry shampoo at your roots only if you need to absorb excess oil between washes, but avoid applying it to your lengths where damage exists.
Watch your environment and adjust your routine accordingly. Chlorine, salt water, and hard water all deposit minerals that make damaged hair feel rough and look dull. Wet your hair with clean water before swimming to reduce absorption of pool chemicals. Install a shower filter if your water feels hard or leaves residue on your hair after washing.
Step 6. Customize for your hair type
The repair methods you choose must match your hair texture and density because different hair types respond differently to the same treatments. Fine hair gets weighed down by heavy oils while thick hair soaks them up without looking greasy. Curly hair needs completely different techniques than straight hair to recover from damage. When you customize how to repair damaged hair for your specific type, you see results faster and avoid wasting money on products that work against your natural texture.
Fine or thin hair adjustments
Fine hair has a smaller diameter per strand and shows damage more obviously than thick hair. You need lighter products that provide moisture and protein without coating your strands in heavy ingredients that make hair look flat and limp. Skip thick butters like shea or mango butter in your deep conditioning treatments. Choose liquid leave-in conditioners instead of creams, and apply them only from mid-shaft to ends, never at your roots.
Your fine hair repairs faster with these specific modifications:
- Use protein treatments every 3 weeks instead of waiting 4-6 weeks because fine hair loses structure quickly
- Apply treatments in thin layers and comb through to distribute evenly without buildup
- Rinse thoroughly for an extra 30 seconds to remove all product residue
- Choose volumizing products that add body while conditioning
Avoid oils heavier than argan or grapeseed oil. Fine hair cannot absorb thick oils like coconut or castor oil without looking greasy and stringy. Apply only 2-3 drops of lightweight oil to damp ends after washing, never more. Your hair needs moisture but in concentrations that match its ability to absorb products without becoming oversaturated.
Thick or coarse hair adjustments
Thick hair has more cuticle layers and naturally drier texture because your scalp's natural oils struggle to travel down the entire length of each strand. You need richer, heavier products and longer treatment times for ingredients to penetrate fully through all those cuticle layers. Your damaged thick hair benefits from butter-based deep conditioners and pure oils like coconut, avocado, or olive oil.
Double your treatment times compared to the base recommendations. Apply deep moisture treatments for 45 minutes minimum or leave them on overnight twice per week. Use a plastic cap and add heat from a warm towel wrapped over the cap for the first 15 minutes to open your cuticles wider and allow better absorption. Thick hair also needs more product volume, so use at least twice as much conditioner as fine-haired people would use on the same length.
Coarse hair texture means your cuticle naturally sits more open, making your hair more porous and requiring constant moisture replenishment.
Focus moisture and protein treatments on your ends and mid-lengths where damage concentrates. Thick hair grows slowly and your ends represent years of accumulated wear. Section your hair into 6-8 parts when applying treatments to ensure every strand receives adequate product coverage.
Curly or textured hair adjustments
Curly and textured hair types face unique damage patterns because the natural bends in each strand create weak points where breakage happens easily. Your curl pattern also prevents scalp oils from coating your lengths, making every strand naturally drier than straight hair. You need to detangle only when wet with conditioner coating your hair, never when dry.
Apply the LOC method for damaged curly hair: leave-in conditioner, oil, then cream in that exact order after every wash. This layering technique seals maximum moisture into your high-porosity damaged curls. Sleep with your curls in a satin bonnet every single night and refresh with water and leave-in conditioner each morning rather than combing or brushing. Use protein treatments every 4-6 weeks focusing on areas where your curl pattern has loosened from damage.
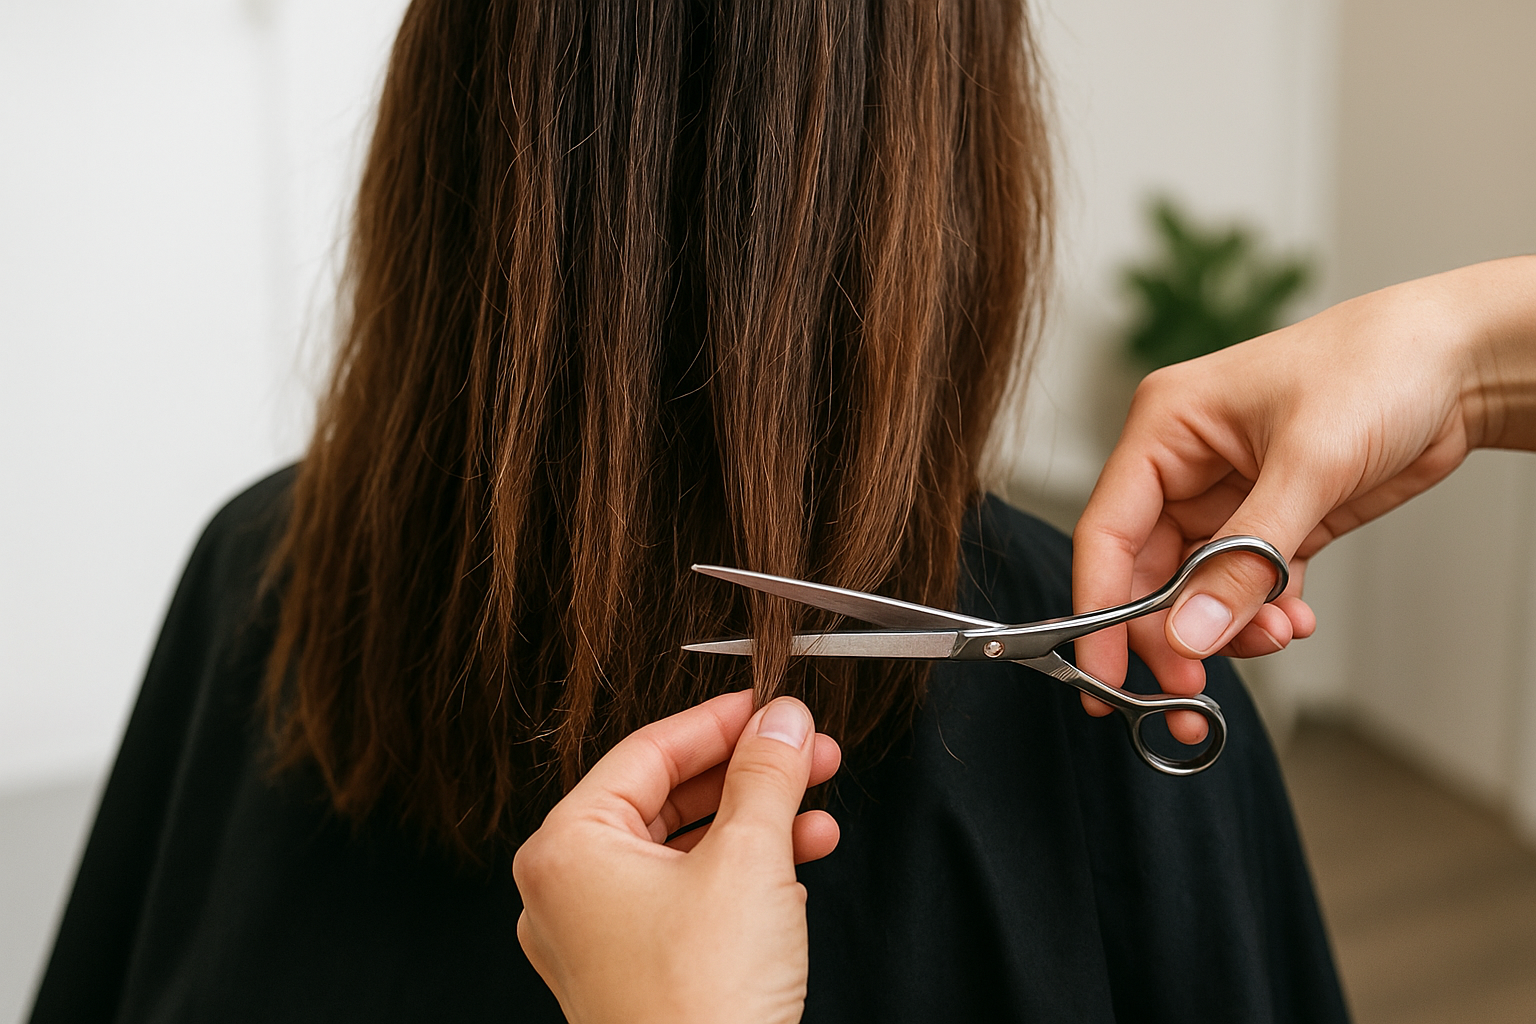
When to trim or get expert help
Sometimes your at-home efforts cannot solve the damage you see and feel. You reach a point where continuing to treat severely damaged hair wastes time and money without visible improvement. Knowing when to trim off the worst sections or seek professional help accelerates your path to healthy hair. Your damaged ends prevent the rest of your hair from looking good no matter how many treatments you apply.
Signs you need professional scissors
Schedule a trim when you notice split ends traveling up the hair shaft more than half an inch from the tips. These splits continue moving upward and destroy healthy hair above them if you leave them alone. You also need to cut when your ends feel crispy or break off in your fingers even after multiple deep conditioning sessions.
Watch for these specific indicators that trimming becomes necessary:
- Hair snaps when you gently stretch it between your fingers
- Ends tangle within minutes after brushing
- The last two inches look significantly lighter or more damaged than the rest
- You see white dots or multiple splits along individual strands
Trimming removes permanently damaged sections that cannot benefit from any treatment. You preserve the healthier portions above the cut line and allow yourself to focus repair efforts where they actually work.
Learning how to repair damaged hair includes accepting that some damage requires removal, not treatment.
What salon treatments can do
Professional stylists offer targeted protein treatments and bond-building services that penetrate deeper than home products. Olaplex, K18, or Brazilian Blowout treatments rebuild internal bonds and provide results lasting 6-8 weeks. These services cost between $75-$200 but deliver concentrated repair you cannot achieve at home. Book a consultation when your hair refuses to improve after four weeks of consistent home care or when damage extends throughout your entire length rather than just the ends.
Final thoughts for healthier hair
Learning how to repair damaged hair requires patience and consistency more than expensive products or salon visits. You now have a complete system that addresses both the appearance of damage and prevents new problems from forming. The improvements you see in week one will compound over the following months as you maintain your gentle routine and protect your hair from daily stressors.
Start with the moisture reset and damage prevention steps today rather than waiting for the perfect moment or buying every product mentioned here. Your hair responds to what you do consistently, not what you do perfectly once. Small daily habits like sleeping in a silk bonnet and skipping heat tools protect your progress better than occasional intensive treatments applied irregularly.
Browse our curated selection of hair care essentials to find gentle products that support your repair routine without harsh sulfates or damaging ingredients. Focus on what works for your specific hair type and damage level, then adjust your approach as your hair improves.