
Starting a curly hair care routine for beginners can feel overwhelming when you're staring at dozens of products and conflicting advice online. Should you co-wash or shampoo? Scrunch or plop? If you've ever felt like your curls have a mind of their own, you're not alone, and you don't need a cosmetology degree to get them under control.
I know this firsthand. My own hair is thick, wavy, and prone to frizz, especially after I once dyed it blond and spent months trying to undo the damage. That trial-and-error process taught me something valuable: understanding your hair type changes everything. Once I figured out what actually worked, I stopped wasting money on products that sat unused under my bathroom sink. That experience is a big part of why Beautifully Within exists, to help you skip the guesswork and find what works from the start.
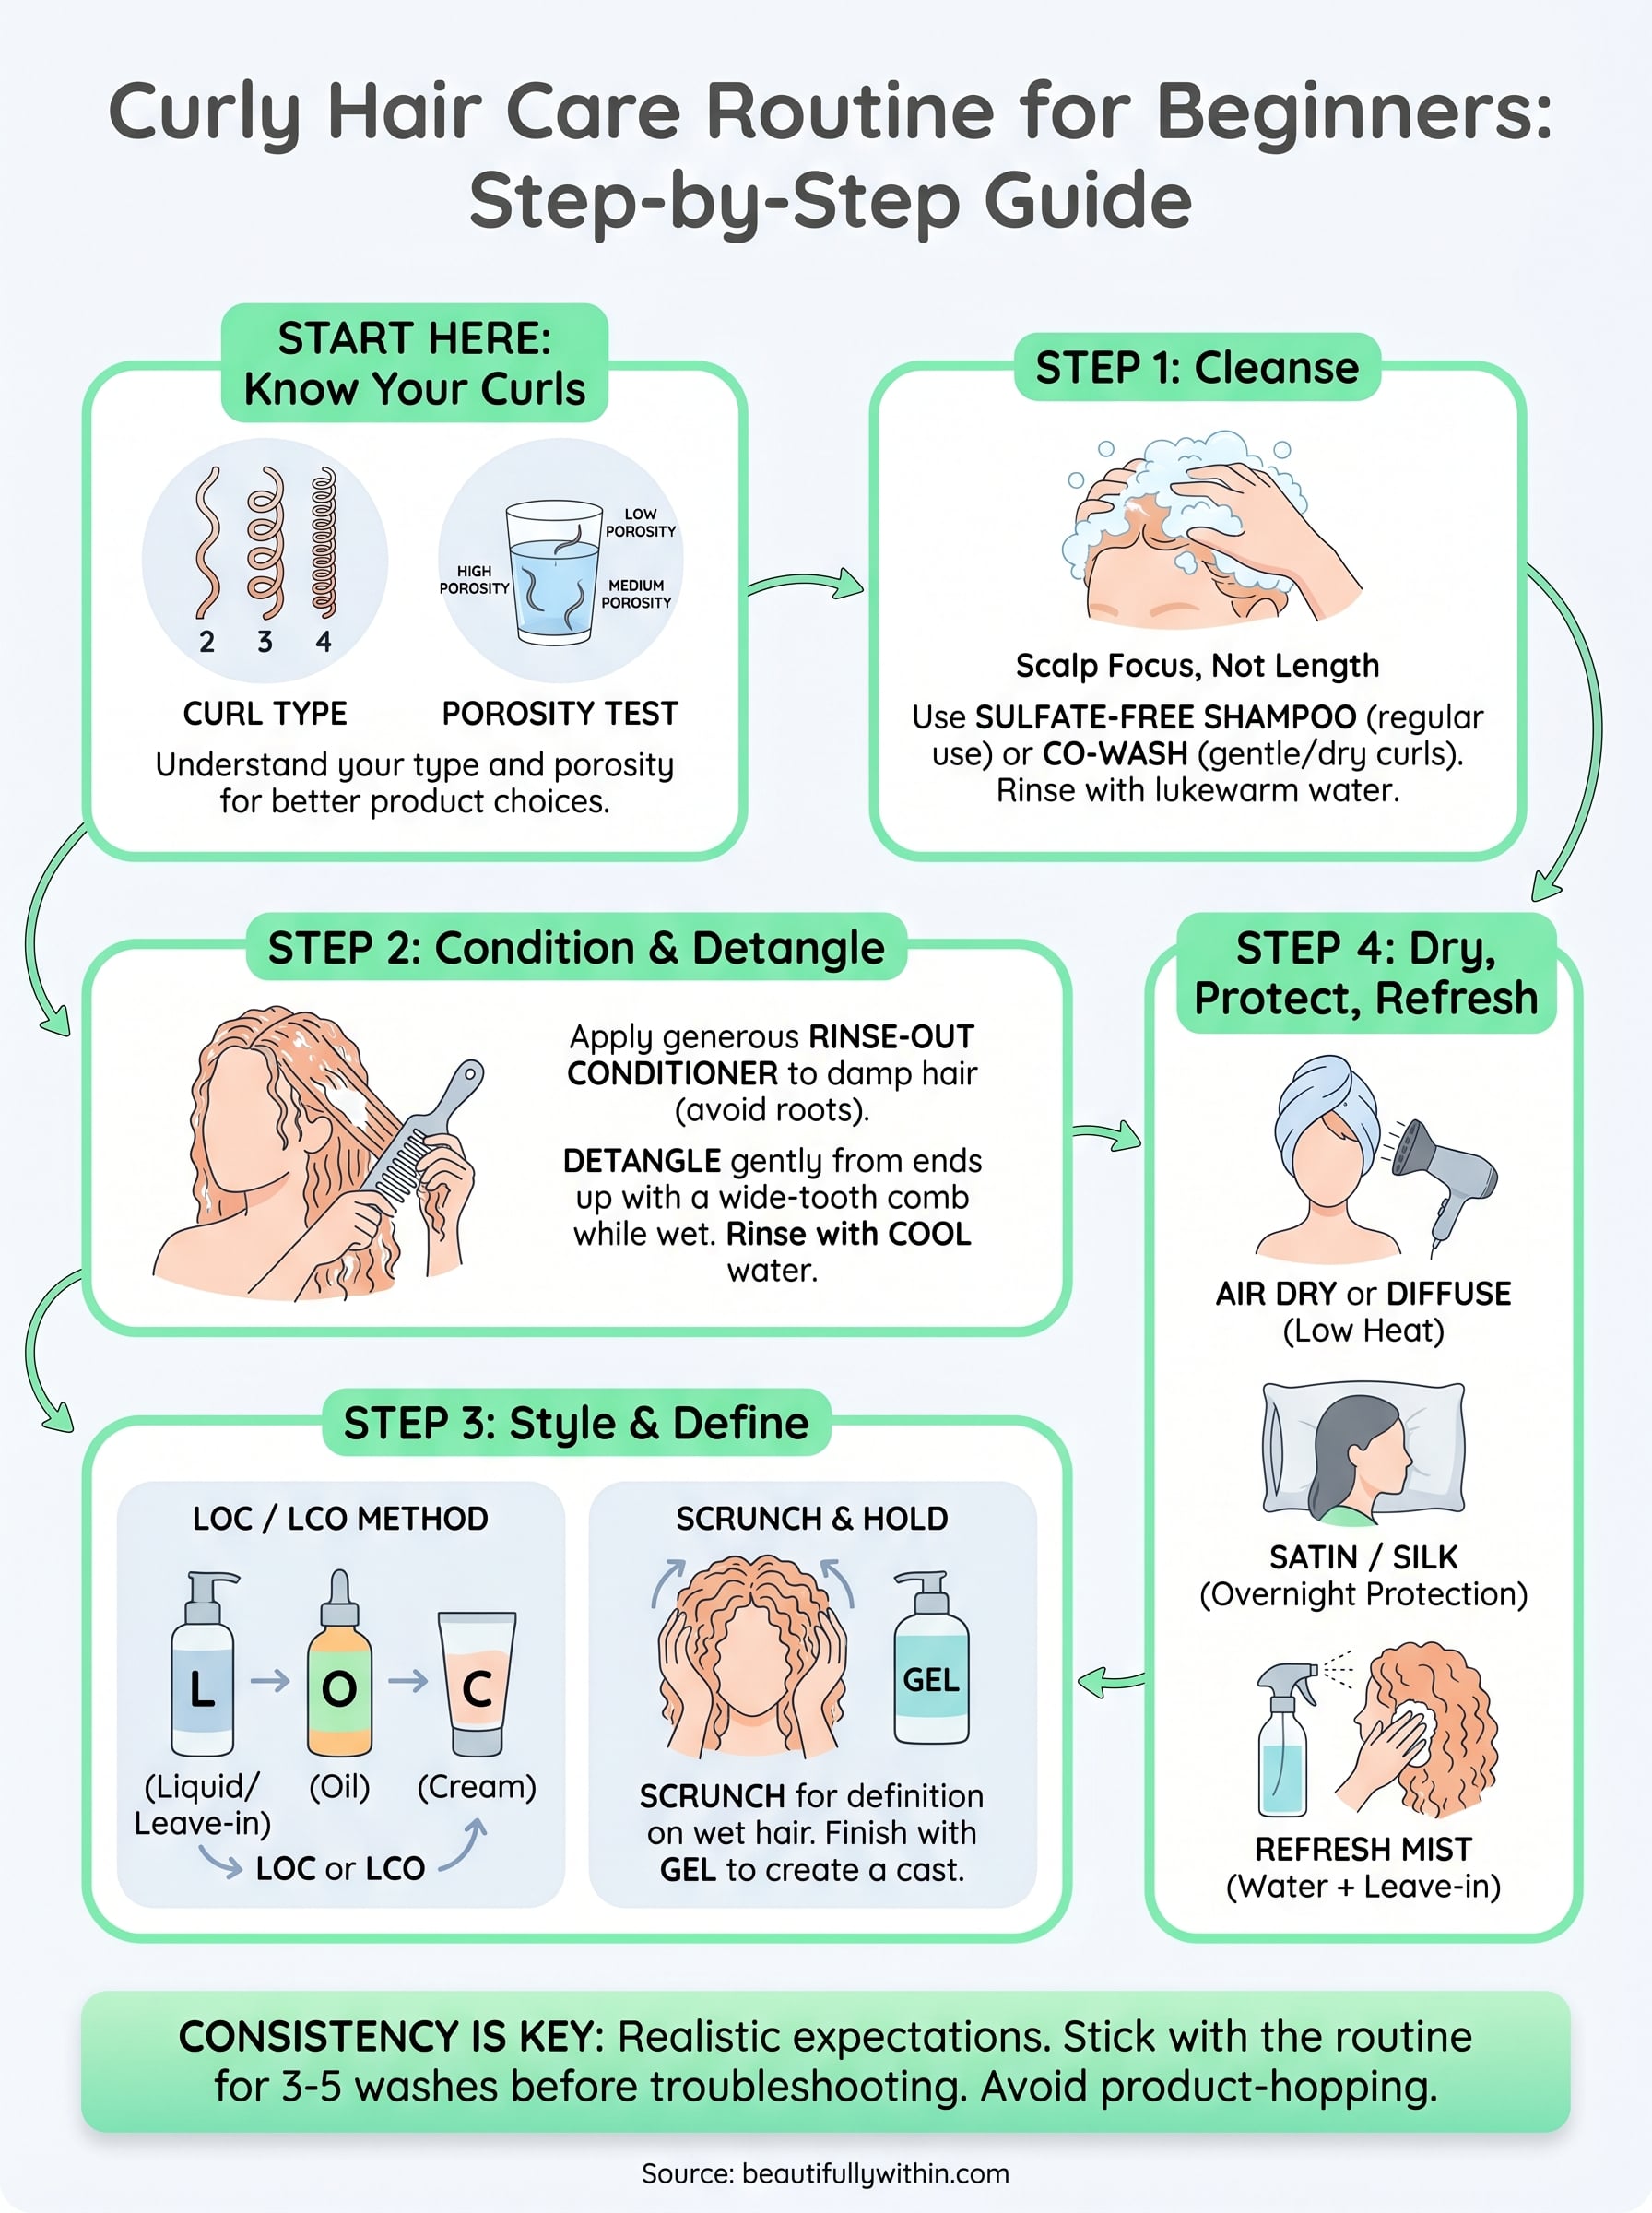
This guide breaks down a complete curly hair routine into clear, beginner-friendly steps, from wash day to styling. You'll learn the right order to apply products, which essentials to start with, and simple techniques to manage frizz and define your curls without overcomplicating things. Let's get into it.
What to know before you start
Before you buy a single product or follow a single tutorial, you need a basic understanding of what makes your curls tick. Curly hair isn't one thing. It ranges from loose waves to tight coils, and what works for one curl pattern can leave another looking limp or frizzy. Jumping straight into a routine without this foundation is one of the most common mistakes beginners make, and it's exactly why so many people give up before their curls have a real chance.
Know your curl type and porosity
Curl type and hair porosity are the two most useful things to understand before you build any curly hair care routine for beginners. Curl type refers to the shape of your curl pattern, commonly categorized from type 2 (wavy) to type 4 (coily). Hair porosity refers to how well your hair absorbs and holds moisture, which directly determines which products will actually work for you.
Porosity matters more than curl type when it comes to choosing products. Low-porosity hair resists moisture, while high-porosity hair absorbs it fast but loses it just as quickly.
You can do a rough porosity test at home: drop a clean strand of hair into a glass of room-temperature water. If it floats near the surface for a while, you likely have low porosity. If it sinks to the bottom quickly, you likely have high porosity. This test isn't perfectly scientific, but it gives you a practical starting point before you spend any money on products.
| Porosity Type | What It Means | What Helps |
|---|---|---|
| Low | Cuticles are tightly closed; moisture struggles to enter | Lightweight products; use gentle heat to open cuticles |
| Medium | Cuticles are balanced; absorbs and retains moisture well | Most products work; maintain with regular deep conditioning |
| High | Cuticles are raised and open; absorbs moisture fast but loses it quickly | Heavier creams; seal with an oil after moisturizing |
The products you actually need to start
Starting simple is the smartest move you can make. Three core products cover the basics: a sulfate-free shampoo or co-wash, a rinse-out conditioner, and a styling product like a gel or curl cream. Adding too many products at once makes it impossible to identify what's helping and what's working against you.
Sulfate-free shampoo matters because regular shampoos strip the natural oils your curls need to stay defined and moisturized. A good rinse-out conditioner does double duty by softening the hair shaft and making detangling significantly easier. A gel or curl cream then gives you hold and definition without weighing your curls down, as long as you use the right amount for your hair's thickness and density.
Set realistic expectations for your first wash days
Your curls will not look perfect the first time, and that is completely normal. First-time results are almost always inconsistent because your hair needs time to adjust, especially if you're coming from a routine that involved a lot of heat or harsh cleansers. Most people start seeing a real, noticeable difference after three to five wash days, once the hair is better hydrated and you've had a chance to practice the techniques.
Consistency is what creates change, not product-hopping. Stick with the same basic steps for at least three to four weeks before you start swapping anything out or adding new steps. Give your hair and your hands time to learn the routine before you start troubleshooting.
Step 1. Cleanse your scalp and remove buildup
Cleansing is the foundation of any curly hair care routine for beginners, but most people do it wrong. The goal is to clean your scalp without stripping the natural oils that keep your curls defined and moisturized. Using the wrong shampoo or applying it the wrong way leads to dryness, frizz, and a cycle of over-washing that makes everything worse.
Choose the right cleanser
Not all cleansers work the same way on curly hair. Sulfate-free shampoos remove dirt and buildup without the harsh detergents that dry out your curl pattern. If your scalp isn't particularly oily and you don't rely on heavy styling products, a co-wash (conditioner wash) is another option that cleanses gently while adding moisture at the same time. Start with a sulfate-free shampoo if you're unsure, and only move toward co-washing once you understand how your scalp responds.
If you use heavy styling products like thick creams or oils regularly, co-washing alone may not fully remove buildup, so alternate with a clarifying shampoo every few weeks.
Here's a quick breakdown of your cleanser options:
| Cleanser Type | Best For | How Often |
|---|---|---|
| Sulfate-free shampoo | Most curl types; regular use | Every 1-2 weeks |
| Co-wash | Fine or low-porosity curls; gentle cleanse | Weekly or as needed |
| Clarifying shampoo | Heavy buildup; product-heavy routines | Once a month maximum |
Apply shampoo correctly
The way you apply and rinse your shampoo matters as much as which product you pick. Focus the shampoo on your scalp only, not the length of your hair. Use your fingertips (not your nails) to massage in small circular motions. This lifts dirt and buildup without tangling or roughing up your cuticles. The shampoo rinses through the rest of your hair naturally as the water carries it down.
Piling your hair on top of your head or scrubbing along the length are two habits that cause friction and lead to breakage. Rinse with lukewarm water rather than hot, since hot water forces the cuticle open and lets moisture escape faster, leaving your curls dry before you even reach the conditioning step.
Step 2. Condition and detangle without breakage
Conditioning is where your curly hair care routine for beginners starts to pay off. This step adds the moisture your curls need to stay soft and defined, and it sets up the detangling process so you can work through knots without snapping your hair at the root. Rushing through conditioning or skipping it entirely is a fast track to dryness and breakage, so treat this step as seriously as cleansing.
Apply conditioner the right way
Start by gently squeezing out excess water from your hair before you apply conditioner. Your hair should be damp but not soaking wet, because too much water dilutes the conditioner before it has a chance to absorb. Apply a generous amount from your mid-lengths to your ends, and avoid applying conditioner directly to your scalp, since that can weigh your roots down and contribute to buildup over time.
Leave the conditioner in for at least three to five minutes before rinsing. For high-porosity or very dry curls, cover your hair with a shower cap and let the warmth from your shower help the conditioner absorb deeper into each strand.
Sectioning your hair into two or four parts while you condition gives you better coverage across thicker or denser hair. Working section by section also makes the next step, detangling, significantly more manageable because you're dealing with smaller amounts at a time rather than one large tangled mass.
Detangle with the right tools and technique
Use a wide-tooth comb or a detangling brush while the conditioner is still in your hair. This matters: never detangle dry curly hair. The conditioner acts as a slip agent, which allows knots to release without tearing the strand. Start at the ends and work your way slowly up toward the roots, holding the section above where you're combing to reduce the tension on your scalp.
Follow this detangling sequence every wash day:
- Divide your hair into sections (two to four depending on thickness)
- Apply conditioner generously to each section
- Use your fingers first to break apart large knots gently
- Follow with a wide-tooth comb from ends up to roots
- Rinse each section with cool water before moving on
Cool water at the rinse stage makes a real difference. It seals the cuticle, which locks in the moisture you just added and helps your curls clump together more cleanly before you move into styling.
Step 3. Apply products in order and style for definition
The order you apply products in matters more than most beginners realize. Applying a heavy cream before a leave-in conditioner, for example, blocks the lighter product from reaching your hair shaft, which means your curls miss out on hydration even when you're using the right products. Once you know the correct sequence, this step becomes one of the most satisfying parts of your curly hair care routine for beginners.
Follow the LOC or LCO method
LOC stands for Liquid, Oil, Cream, and LCO stands for Liquid, Cream, Oil. These two methods are the most reliable product-layering frameworks for curly hair, and which one works better depends on your porosity.
Low-porosity hair generally responds better to LCO because applying oil before cream can block moisture from entering the tightly closed cuticle.
| Method | Order | Best For |
|---|---|---|
| LOC | Leave-in, Oil, Cream | High-porosity or very dry curls |
| LCO | Leave-in, Cream, Oil | Low-porosity or fine curls |
Apply each product section by section while your hair is still dripping wet, right after you step out of the shower. Wet application helps products distribute evenly and encourages your curls to clump together naturally before they start drying.
Scrunch for definition, not disruption
Scrunching is the core styling technique that coaxes curls into their natural shape without disrupting the clumping you built during the conditioning step. To scrunch correctly, take a section of hair in your palm, press it upward toward your scalp, hold for a second, and release. Repeat this across your entire head.

Use a microfiber towel or a soft cotton T-shirt to scrunch out excess water after you apply your styling products. Regular terry cloth towels create friction that breaks up clumps and causes frizz, so swap them out if you haven't already.
Finish with a gel for hold
Applying a curl-defining gel as your final product locks in the shape you've built and creates a cast around each curl as it dries. That cast feels crunchy at first, but that is normal and actually a sign the gel is working. Once your hair is fully dry, scrunch the cast out with your hands or a small amount of oil to reveal soft, defined curls underneath. Start with a dime-sized amount and adjust based on your hair's thickness.
Step 4. Dry, protect overnight, and refresh between washes
How you dry your hair after styling determines whether the curls you worked so hard to define actually survive intact. Touching or moving your hair while it dries is the fastest way to break up curl clumps and invite frizz back in. Let your curls set undisturbed, and your curly hair care routine for beginners starts paying off long before your next wash day.
Dry your curls without disturbing them
Your two best drying options are air drying and using a diffuser attachment on a blow dryer. Air drying is the gentler choice and works well if you have time, but it requires you to leave your curls completely alone until they are fully dry, not just damp. Pulling at or touching them while they are still wet breaks apart the clumps and leaves you with frizz rather than definition.
If you choose to diffuse, use the lowest heat setting and hover the diffuser under each section without rubbing or scrubbing. High heat forces the cuticle open and causes frizz before your curls have a chance to set.
A diffuser shortens drying time significantly, which matters on busy mornings. Hold the diffuser close to your scalp, scrunch your hair up into the diffuser bowl, and hold it still for 20 to 30 seconds per section before moving to the next area of your head.
Protect your curls overnight
Sleeping on a standard cotton pillowcase pulls moisture out of your hair and creates friction that destroys your curl pattern by morning. Switch to a satin or silk pillowcase instead, or wrap your hair in a satin bonnet before you sleep. Both options reduce friction and keep your curls intact through the night.
| Method | How It Helps | Best For |
|---|---|---|
| Satin pillowcase | Reduces friction; keeps moisture in | All curl types |
| Satin bonnet | Full coverage; protects shape and volume | Longer or thicker curls |
| Pineapple (loose top knot) | Lifts hair off neck; preserves curl clumps | Wavy to loose curly hair |
Refresh curls between wash days
Most people with curly hair wash every one to two weeks, which means your curls need a refresh in between. Fill a small spray bottle with water and a few drops of your leave-in conditioner, then lightly mist your hair and scrunch gently to reactivate any remaining product and reshape your curls. You don't need to rewet completely; just dampen enough to bring the curl back.
- Mist hair lightly with your refresh spray
- Scrunch from ends up toward roots
- Apply a small amount of curl cream if curls feel dry
- Air dry or diffuse on low for two to three minutes
Your next wash day plan
You now have everything you need to run a complete curly hair care routine for beginners from start to finish. Start with a sulfate-free shampoo on your scalp, condition and detangle in sections, layer your products using the LOC or LCO method, and let your curls dry without interference. Protect them overnight with satin, and refresh between washes with a simple spray bottle mix.
Your first wash day will not be perfect, and that is fine. Consistency over several weeks matters far more than getting every single step exactly right on day one. Stick with the same products and sequence, take note of what your curls respond to, and adjust from there.
When you are ready to explore products that actually support your curl goals, browse the hair care collection at Beautifully Within to find frizz-fighting and moisture-locking options built for every curl type.